plaits for ae modular. many sounds, crammed into 2U
one of the most popular modules in eurorack, now available for your dinky little modular system.
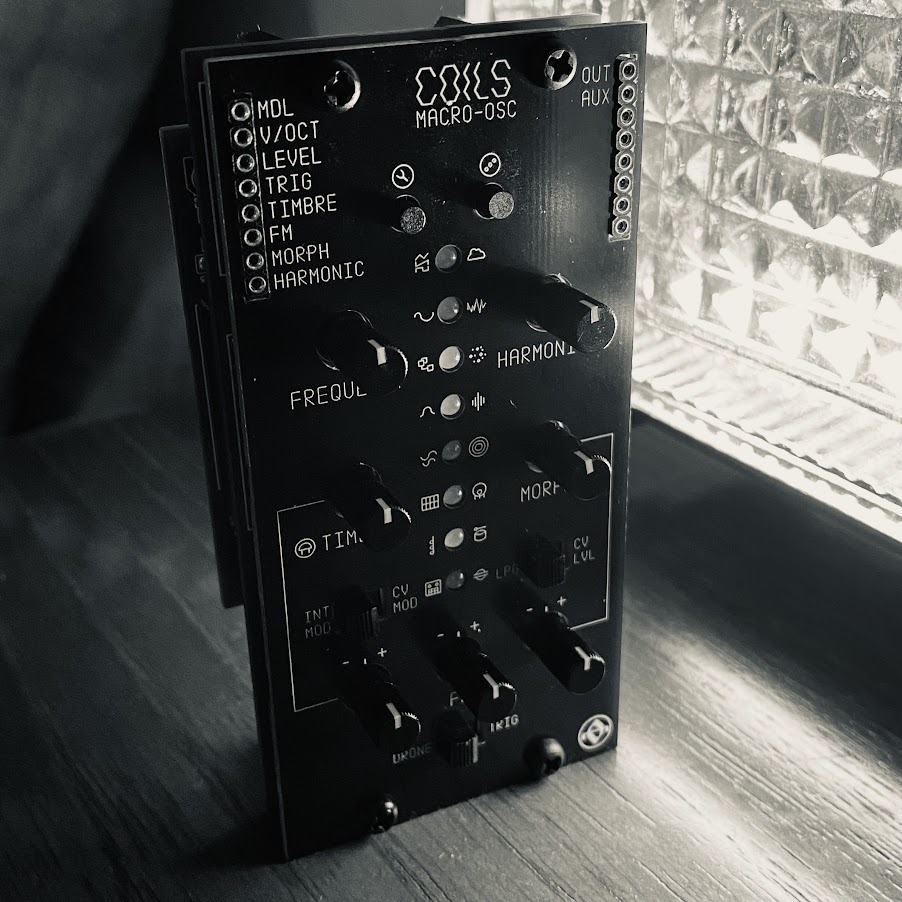
coils is based on plaits which in turn is the successor to braids
plaits and braids originally developed by emilie gillet for mutable instruments.
MI modules often feature a smart technique for detecting whether or not a cable is inserted in an input. with AEs single-signal DuPont style wires this isn't possible, so this automatic detection is emulated with a series of switches.
DRONE / TRIG - in drone mode the oscillators will run freely, just as plaits runs when no patch cable is inserted into the 'trig' input.
in TRIG mode the module will be silenced until a trigger is recieved on the trig CV input. each trigger will fire the internal low pass gate*.
LPG / CV LVL - with the module in 'drone' mode setting this switch to CV LVL will silence the audio out until a signal is receieved on the LEVEL cv input. unlike trig this does not fire the internal envelope but rather directly controls the output level - essentially an internal VCA.
INT MOD / CV MOD - the timbre, FM, and morph parameters can be modulated when a trigger is received; when INT MOD is selected this modulation will be taken from the internal envelope shape. switch to CV MOD to modulate these parameters using external CV instead. modulation of these three controls is attenverted with the lowest three pots - with the attenuverter in the centre position no modulation will be receieved. turn CW for increasing levels of positive modulation, and CCW for negative modulation.
* to edit the internal low pass gate, hold the left button (with the spanner/wrench symbol) and use the timbre and morph controls to adjust the filter and decay time, respectively.
to adjust the range of the frequency knob, hold the right button and turn the harmonics control. at full CCW the oscillators will run at LFO rate.
for full details of each synthesis model, please refer to the original plaits manual
also check out this handy cheat sheet
left button - cycle through GREEN (tonal) synthesis modes*. hold and turn morph and timbre to adjust the internal LPG cutoff and attack.
right button - cycle through RED (noise / percussive) synthesis modes. hold and turn harmonics to change the range of the frequency control.
*quickly press & hold both buttons together (about 1 second) to switch between normal and alternative navigation modes.
IN ALT NAVIGATION MODE:
left button - move backwards through all synth modes.
right button - move forwards through all modes.
BONUS "SECRET" SYNTH MODELS:
only accessible in alt nav mode. cycle forwards through all green and red models until you end up in YELLOW mode. there are eight bonus sounds in this mode, including a 6-op FM synth, a string machine emulation, square wave arpeggiator (chiptune!) etc. see firmware v1.2 notes for full details.
CALIBRATION:
press and hold both buttons for 2 seconds to enter calibration mode if needed. when one LED starts flashing, send 1v to the v/oct input, then press any button. the led will change colour, now send 3v to the v/oct input. press a button again to return to normal mode.
if all the leds flash red after calibrating, it means the calibration has failed. double check your voltage levels and try again.
LFO MODE:
while holding the right button, turn harmonics fully CCW (the leds will pulse up and down). in LFO mode the frequency control will range from 0.016Hz (~1 minute) to 16Hz.
ACCESSIBILITY:
holding the right button while the module powers up will enable/disable colour-blind mode. when enabled, the green/red/yellow model indicators are replaced with different brightness levels.
once you've mastered the controls, try reversing the front panel for a bonus challenge :)
firmware updates (if available) can be applied in a similar way to Tangible Waves CIRRUS module. set the frequency knob to noon, then connect audio from your computer/phone/tablet to your TW rack, either throught the master module, 4I/O or similar, and connect the audio to the MDL input. power up the rack while holding the left button on COILS, then play the audio. when complete, the module will reboot. if all leds flash red, the update has failed, please adjust your audio levels and try again.
alternatively, there are four right-angle pins on the bottom of the module which can be connected to an ST-LINK adaptor or similar. see https://pichenettes.github.io/mutable-instruments-documentation/modules/plaits/open_source/ for details on firmware hacking and the mutable dev environment.